Growing rosemary from cuttings is an easy and inexpensive way to cultivate this aromatic herb.
Propagating rosemary in water is not only beginner-friendly but also ensures a higher success rate compared to planting directly in soil.
Once the roots develop, the cuttings can be transplanted into pots, allowing you to enjoy fresh rosemary at home year-round.
Here’s a step-by-step guide to growing rosemary from cuttings in water and successfully transplanting them into pots.
Step 1: Gather Your Materials
Before you begin, make sure you have everything ready:
- A healthy rosemary plant
- Sharp scissors or pruning shears
- Clear glass or jar
- Room-temperature water
- Small pots (6-8 inches in diameter)
- Well-draining potting mix (with sand or perlite)
- Optional: Rooting hormone
Step 2: Take Healthy Cuttings
Select 4-6 inch long cuttings from a healthy rosemary plant, preferably from new growth (the green, soft stems) rather than older, woody stems.
- Use clean scissors or pruning shears to snip the cutting just below a node (where leaves grow).
- Remove the bottom leaves from the lower 1-2 inches of the stem to expose nodes for rooting.
Step 3: Prepare and Place the Cuttings in Water
- Fill a clear jar or glass with room-temperature water.
- Place the rosemary cuttings into the water, ensuring that the exposed nodes are submerged.
- Place the jar in a bright spot with indirect sunlight (a windowsill works well).
Pro Tip:
- Use rooting hormone by dipping the cut end into the powder before placing it in water to speed up the rooting process.
- Change the water every 2-3 days to keep it fresh and prevent bacterial growth.
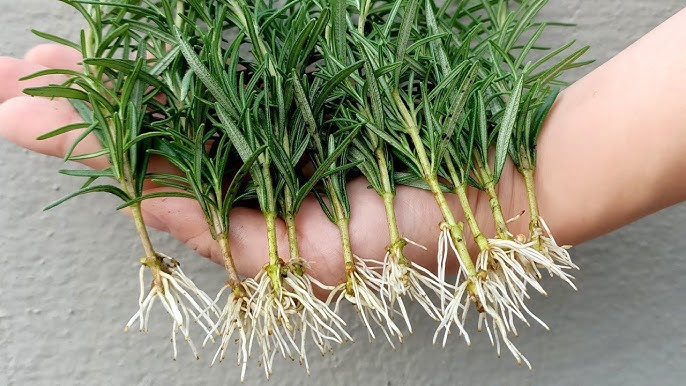
Step 4: Monitor Root Growth
Be patient—roots usually start to appear within 2-4 weeks.
- Once the roots reach about 2 inches long, the cutting is ready to be transplanted into soil.
- If roots haven’t appeared after 4 weeks, try refreshing the water more frequently or move the jar to a different spot with brighter indirect light.
Step 5: Transplant the Rooted Cuttings into Pots
Materials for Transplanting:
- A pot with drainage holes
- Well-draining soil mix (a blend of potting soil, sand, and perlite)
- A small trowel
How to Transplant the Cuttings:
- Fill the Pot with Soil: Use a well-draining potting mix to prevent waterlogging.
- Make a Hole in the Soil: Use a finger or small trowel to create a hole deep enough for the roots.
- Plant the Cutting: Place the cutting carefully in the hole, ensuring the roots are fully buried. Gently pat the soil around the cutting to secure it.
- Water Thoroughly: Water the soil to help settle the cutting in its new pot.
Step 6: Care for Your Potted Rosemary
Once transplanted, the rosemary needs the right care to thrive.
1. Light
Place the pot in a spot where it will receive 6-8 hours of sunlight each day, such as a sunny windowsill or patio.
2. Watering
Allow the top inch of soil to dry out before watering again. Overwatering can lead to root rot.
3. Fertilizing
Feed the rosemary with a diluted liquid fertilizer once a month during the growing season (spring and summer).
4. Pruning
Regularly prune the tips of the plant to encourage bushier growth. Use the trimmings in your favorite recipes!
Common Problems and Solutions
- Roots Not Forming in Water
Try changing the water more frequently or place the cuttings in brighter indirect light. Using rooting hormone can also help.
- Drooping Cuttings After Transplanting
This could indicate transplant shock. Keep the soil evenly moist and avoid exposing the plant to direct sun for a few days after transplanting.
- Yellowing Leaves
Overwatering is the likely cause. Ensure the soil drains well and allow it to dry between waterings.
Growing rosemary from cuttings in water is an easy and rewarding way to propagate this fragrant herb.


